Bottling the genie: How I run my AI environment DIY
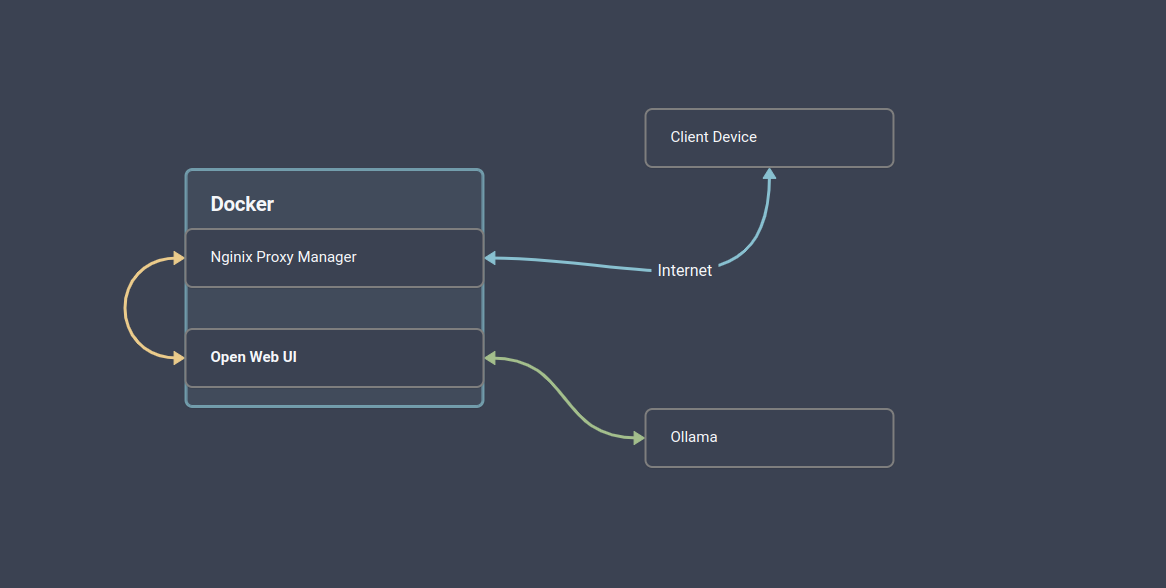
I recently set up a a system on our shared server that allows for interfacing with AI tools and models over the internet. It is an openAI style tool owned and operated all by us. Open WebUI is free and runs in a Docker container. It hooks up to Ollama to call the models, and Ngnix to serve it to the internet.
List of services used
- Docker - Docker: Accelerated Container Application Development
- Nginx - nginx
- Open WebUI - Open WebUI
- Ollama - Ollama
Setup
Docker
Docker was a pain in the ass to set up. For some reason, it was having issues downloading on the server and on my local machines. When docker was installed, I used the command
sudo docker pull ghcr.io/open-webui/open-webui:main
to download the container, then used the command
sudo docker run -d --network=host -v open-webui:/app/backend/data -e OLLAMA_BASE_URL=http://127.0.0.1:11434 --name open-webui --restart always ghcr.io/open-webui/open-webui:main
Command Breakdown:
-d: Runs the container in detached mode (in the background).--network=host: This makes the container use the host machine’s network. This is convenient but has security implications (see Security Considerations below).-v open-webui:/app/backend/data: This creates a volume mount, linking a local directory namedopen-webuion the host machine to the/app/backend/datadirectory inside the container. This ensures that data created within the container persists even if the container is stopped or removed.-e OLLLAMA_BASE_URL=http://127.0.0.1:11434: This sets theOLLAMA_BASE_URLenvironment variable inside the container to point to the local Ollama instance. This allows Open WebUI to communicate with Ollama.--name open-webui: Assigns the name “open-webui” to the container.--restart always: This ensures that the container automatically restarts if it crashes.
This setup launches the container on the default port 8080. You should be able to access the WebUI at localhost:8080. If port 8080 is already in use, you can specify a different port using the -p flag (e.g., -p 8081:8080 would map port 8081 on the host to port 8080 in the container).
This launches the container on the default port of 8080. At this stage, the WebUI should be available at localhost:8080. If needed, you can add the flag -p to specify the port if 8080 isn’t available.
Ollama
ollama manages all of the models and serves them for use.
to install, I ran this
curl -fsSL https://ollama.com/install.sh | sh
installing new models is easy:
ollama run gemma3n
Exposing to the local network
By default, Ollama is not accessible on other devices or services on the network, so it’s unreachable by the docker container with webUI. This article was what I used to fix this Aident Blog - How to Run Ollama and Connect to the Service API Through Internal Network or Internet
- Edit the service file
sudo systemctl edit ollama.service
- Add the following snippet to the file
[Service]

Environment="OLLAMA_HOST=0.0.0.0"
- Restart ollama
sudo service ollama restart
You can test to see if it worked by calling it via and API call
curl http://192.168.1.105:11434/api/generate -d '
{
  "model": "tinyllama",
  "prompt": "Why is the sky blue?",
  "stream": false,
  "options": {
    "num_thread": 8,
    "num_ctx": 2024
  }
}' | jq .
If it works, then you’re ready to move onto the next steps.
Nginx
I haven’t used this before, so my knowledge of this is pretty rudimentary. I followed this tutorial for the most part and it got me pretty far.
Nginx has a proxy manager tool that provides a nice interface for all of the configs. In order to set this up, they use docker.
Install and run Nginx Proxy Manager
- Make a new directory to house all of the container files.
- Create a docker-compose file
sudo nano docker-compose.yml - Add the following to the file and save it.
services:
  app:
    image: 'docker.io/jc21/nginx-proxy-manager:latest'
    restart: unless-stopped
    ports:
      - '81:81'
      - '80:80'
      - '443:443'
    volumes:
      - ./data:/data
      - ./letsencrypt:/etc/letsencrypt
- Build the container with
sudo docker container compose up -d - The proxy manager should be running now on port 81.
Configure DNS Settings and set up new SSL certificate
Create SSL cert
- Open up the Nginx Proxy Manager at localhost:81.
- Log in with the default credentials ( admin@example.com / changeme)
- Go to SSL Certificates → Add SSL Certificate → Let’s Encrypt.
- Fill in the fields and enable DNS challenge if possible. This step is different depending on the registrar (we used Godaddy)
- Agree and continue.
Create proxy host
- Go to Hosts → Proxy Hosts → Add Proxy Host
- Fill in the domain name that you want to use
- Set the scheme to HTTP, enable Websocket Support, and point the IP to the local address that the docker container is running on.
- Select the SSL certificate created in the previous step.
Add URL to open-webui (optional)
This step is only required if you plan on using the webhook feature. The Webhook URL needs to be updated to reference the domain added in order to generate the webhook text.
Great, so now what?
I now have a fully closed system for AI usage. I had a lot of fun setting it up, and now that it’s there, I am not sure what to do. I may try to add webscraping functionality since that will be useful. The other place to go from here is populate the knowledge section.